PLUMBING THE OUTDOOR URINAL
My project relates to plumbing the outdoor urinal project at the Merritt Horticulture Dept.
In this paper I will discuss the path of water and urine through the system and how the system works.
Two diagrams and several photos are included. Please note that at the time of this writing, the project
is not complete. Some of the information below may be incorrect or based on assumption, and some
aspects may need to change based on time and material constraints.
This is a rough diagram of the plumbing for the Outdoor Urinal project:
You will notice that it is a simplified system which is different than the vision initially drawn
out by Brent of Hyphae Designs for this class. The primary difference between this simplified system
and Brent's design is that the current system features no filter, whereas Brent's design includes a slow
sand filter located in the lower rain tank barrel. Here is a photo of Brent's drawing:
The decision was made to simplify the design based on difficulty finding certain parts and
questions about whether or not Brent (who has been extremely helpful) would have time to come back
to class to help us finish the system. Following the current simplified version of this system, I am
confident that we will be able to complete the project on time and test it successfully with the people
and recourses that we have at our disposal at Merritt. The other reason for eliminating the sand filter
was the question of whether or not filtration is necessary, given that the water (rainwater) is a clean
source that will be used only for hand washing and flushing a urinal. There is, however, consensus
that the sand filter is cool and would be interesting from an educational perspective to build into the
system. If we can get it together to make it all work before the end of class that would be ideal, but
this simplified nofilter design should cover us in terms of basic functionality just in case the more
elaborate design is not possible with the time that we have left. Given that this is a design without a
sand filter, I recommend posting a sign next to the sink which tells users that it is recommended not to
drink the water. I also recommend some additional signage that explains how the system works,
where the foot pump is, not to defecate into the urinal, etc.
The plumbing for this project has been superinteresting to work on and I am greatful for the
learning opportunity that it has been and for the support and efforts of class members and staff. Here's
how it works beginning with rain falling into barrels, then moving to the sink and urinal fixtures, and
flowing through drains into a constructed wetland and then down a branched drain into the landscape:
In this system, rain flows down the gutter of a specially designed butterfly roof (which
maximizes rainwater catchment) on top of the small structure that our class has constructed to house
the urinal, sink station, and rainwater tanks. After flowing down the gutter, the water lands in the first
tank which is a cutoff barrel (about 1/3 of the height of a standard 55 gallon plastic barrel) which I
will call “Barrel A”. The top 2/3 of this barrel is set aside for other use in the project. The bottom 1/3
is filled with (clean) gravel but before filling, numerous holes are drilled into in the bottom of the
barrel (using a medium sized drill bit) and a screen is stapled across the bottom of the barrel. Barrel A
provides some level of filtration to keep leaves and other debris from the roof out of the storage
tanks. Barrel A is positioned inside another barrel, which I will call “Barrel B”, which also has it's top
cut off (Seth used a sawzall for cutting barrels). Barrel B functions as a storage tank and therefore
only the top lid of the barrel has been removed. In Brent's design, a toilet float is fitted inside Barrel
B which acts as the connection between Barrel B and “Barrel C”, which is positioned below it. A
small hole is drilled into the bottom of Barrel B so that the toilet float can be fitted in place. Barrel C
is another rainwater storage tank. (In Brent's design, Barrel C houses the slow sand filter.) Given the
heaviness of water, it would be a poor design to have Barrel B full and sitting on top of Barrel C
empty, therefore we must ensure that Barrel C fills first, with Barrel B acting as the secondary storage
tank. [Note: Given that the design has changed, it is possible that the float should actually be
positioned inside Barrel C instead of Barrel B to ensure that it is Barrel C which will be our primary
resevoir. It is also possible that the toilet float (which regulates the amount of water in a given barrel)
may get eliminated from the system all together now that the sand filter has been eliminated. It is also
likely that a larger entry hole connecting Barrel B and Barrel C will be called for. The most quick and
dirty approach would probably be to remove all or most of the bottom of Barrel B, creating a singular
large resevoir or something close to it. I personally hope that we do include the float in our final
design because I think it's clever, but I have these concerns. Stability of the barrels when full should
be considered no matter what approach we ultimately take.]
Barrels A, B, and C are stacked vertically. Barrels B and C have overflows made from 1 1/2”
PVC and 90` fittings. The overflows will drain via gravity to the closest mulch basin, with the
connecting 1 1/2” PVC pipe trenched. Here is a picture of Barrels A, B, and C (without overflow
attached) in the housing built for it by the class. (Barrels B and C will also feature a 1/2” hosebib
located near the bottom of the barrels and connected with a bulkhead fitting to ensure a functional
seal. The hose bibs will allow the tanks to be easily drained for cleaning and maintenance. Note that
the hose bibs are also not attached yet in the photo below.) The last feature of the Barrels which is
also not shown in the photo below but is critical to the system is the primary supply line which
connects the outflow from barrels to the inflow to the sink. In Brent's design, this is a 1/2” hole
drilled towards the top of Barrel C, with a rubber gasket on the interior of the barrel and a male barbed
fitting sticking through, connected to a length of 1/2” flex hose, which connects to a foot pump, which
connects to the sink. Possibly there is 90` elbow connected to a piece of 1/2” pipe vertically
positioned inside Barrel C acting as a straw to ensure that the water below the output is accessible.
The foot punp (“Baby Foot” by Whale Pump) is positioned on the ground below the sink
approximately 12” from the barrels. The handles and some other components from the sink were
removed, leaving only the sink body, the spout, and the top of the drain assembly. The footpump has
2 barbed fittings, one for inflow and one for out. Flex hose connects the pump to its inflow (sourced
from the main output on Barrel C) and a second length of hose connects the pump to the sink via a
barbed fitting on the sink fixture. (We used hose clamps to ensure a good fit).
` The sink is a built into a cob counter (which is unplastered in the photo below). Drainage
for the sink consists of a drain assembly connected to a P Trap which is connected to short lengths of
1 1/2” PVC and some 90` Elbow fittings to enable the necessary turns so the drainage can be
concealed behind the cob counter. Here is a picture of the drainage for the sink:
After flowing down the sink drain the (now) greywater (used handwash water + soap) flows
through the above mentioned turns, surfaces across the interior wall of the structure, turns with a 90`
elbow to a short legth of PVC and bends down with another 90` elbow which is positioned above the
urinal structure. Water will flow freely out from this point, landing on and cleaning the urinal below
it (and hopefully not creating splash). Possibly we should use bushings to size the pipe down to
minimize splash where the greywater comes out of the system to clean the urinal.
The urinal itself will be a tire sliced in various ways to produce the shape shown below. A
drain will be positioned with a bulkhead fitting approximately where the paving stone is in the photo
below. Note that the tire curves upward in an elongated “u” shape, with the drain
positioned at its lowest point (the stone is positioned slightly too forward in this photo) and the back
of the tire mounted to the wall of the structure. Urine will travel via gravity down this same drain
before being flushed by the greywater from the sink. Here is a photo of the beginnings of the tire
urinal (notice there is no drain or mounting, etc yet).
After flowing down the sink drain the (now) greywater (used handwash water + soap) flows
through the above mentioned turns, surfaces across the interior wall of the structure, turns with a 90`
elbow to a short legth of PVC and bends down with another 90` elbow which is positioned above the
urinal structure. Water will flow freely out from this point, landing on and cleaning the urinal below
it (and hopefully not creating splash). Possibly we should use bushings to size the pipe down to
minimize splash where the greywater comes out of the system to clean the urinal.
The urinal itself will be a tire sliced in various ways to produce the shape shown below. A
drain will be positioned with a bulkhead fitting approximately where the paving stone is in the photo
below. Note that the tire curves upward in an elongated asemetrical “u” shape, with the drain
positioned at its lowest point (the stone is positioned slightly too forward in this photo) and the back
of the tire mounted to the wall of the structure. Urine will travel via gravity down this same drain
before being flushed by the greywater from the sink. Here is a photo of the beginnings of the tire
urinal (notice there is no drain or mounting, etc yet).
As a final step, we may dig a trench to be filled with gravel at the bottom of the hill in case the flow is too
great for the infrastructure above. However, it is likely that the issue for the system will be that the flow is too
flow, not too high, as it is anticipated that most of the year the urinal will receive only light use. Again, it has
been an excellent experience for me to work on this project. I thank Marisha, Brent, Molly, and Anders, as
well as classmates Seth, Jordan, Nathan, Morgan, Kendra, and others.
Wednesday, July 29, 2015
Bamboo processing and weaving
Bamboo processing:
Harvesting and cleaning bamboo are not
so hard as we had seen from our experiences in this class. Making bamboo strips
suitable for weaving requires further processing and patience. A comprehensive
guide on each steps of processing the raw material into usable strips for
weaving:
A shorter outline of the process from
harvesting to weaving can be found at: http://www.city.beppu.oita.jp/06sisetu/takezaiku/english/03learning/02make_bamboo/index.html
Japanese weavers have a tool called the
habatori to measure a uniform thickness and width of the bamboo strips whereas
in South Africa there are the round modification knife, straight modification
knife and radian knife.
Weaving patterns
An overview guide on processing bamboo
and weaving simple patterns are at: http://www.eabp.org.et/Publications/Guidelines/BambooHandicraftMakingmanual3-vb.pdf


There
are more than 200 combinations made using these patterns.

Excellent and expensive book on Japanese weaving patterns: https://www.youtube.com/watch?v=5zHukcTFOg8
Video series on many famous Japanese weavers with inspiring work and many aspects of bamboo weaving: https://www.youtube.com/playlist?list=PLorUW7kEpr-1E6H1lxy81WBn2Bl8--cHY
Video on weaving a hexagonal pattern: https://www.youtube.com/watch?v=psHmWNielcw
Video on weaving a chrysanthemum bottom pattern with
blackberry vines: https://www.youtube.com/watch?v=mpF9Wu8IuZc
Another unexpected and common weaving material is the
Japanese honeysuckle vine, which I might use to try out these patterns. This
blog offers instructions on how to process this kind of vine for weaving: http://www.matttommey.com/basket-weaving-techniques
Barn Conversion, Continued
After
careful consideration, it was determined that converting the barn is better
than starting a new structure from scratch.
In many ways, the barn is an ideal spot for this project. The site is flat, the long wall faces south,
mature trees are on the south side, there’s a slope away from the barn to
assist with rain drainage and a composting toilet. It’s a quick walk to the main house, yet is
very private. The views to the south and
the west, especially at sunset, are beautiful, and the vegetable garden is nearby. The barn has water and electricity, and a
roof that will protect building materials from the elements. It’s easy to access by truck for delivering
materials. There is an abundance of clay
soil for cob and large rocks for foundation and retaining walls.


On
the downside, the barn space is pretty large for a first time natural builder
to tackle at 900 square feet. There’s no
documentation of how or when the barn was built, and by whom. With the other side of the structure being
used as a barn, there is an increased risk of fire, and perhaps a need for both
sides to be reinforced, which would turn this into a much larger project.


Developing
a plan has been aided by my house search in Oakland. I’ve reviewed many inspection reports and
learned more about systems: electric, plumbing, and roof. I’ve learned about issues that many homes
have, especially with drainage and water damage, and ways to prevent those problems
from happening. I’ve also been reviewing
tutorials and practicing with SketchUp to create 3D and 2D models of the barn. Surfing the web for research purposes has
been helpful in some ways, but the validity of the information found there is
difficult to confirm.


I’ve
found this site, A House of Straw to be particularly helpful. Carolyn Roberts chronicled the process of building her natural home in Arizona. She's also written a book about her experiences.
Carolyn's photo journal of the process is fantastic. She inspired me to create an earthen floor in the barn:

I also really appreciated her costs worksheet:


These
books have also been/will continue to be great resources:
- The Straw Bale House; Steen, Steen, and Bainbridge
- Building Green; Snell and Callahan (this is our comprehensive text)
- The Composting Toilet System Book; Del Porto and Steinfeld
Project
Schedule (fund/materials acquisition dependent)
Fall/Winter
2015-16
- · Pest inspection - ensure there aren’t termites or rot issues in the existing structure and confirm existing post beam strength
- · Observe roof during rainy season – lay out tarps to see if rain comes through, mark the water line from the roof to determine if there would be enough protection for west and east walls once, look for water stains on inside of roof on both side of barn
- · Observe drainage in surrounding areas –from slopes to the north and east that land on the site
- · If deemed necessary, develop a plan to update the roof and deal with drainage issues
- · Develop a solar map and watch trees to south to see if and when they drop leaves
- · Make materials list
- Begin to search for building materials on Craigslist, Freecycle and at Urban Ore.
- · Make tool list; check tool library and studio to see if they are available in either place
- · Read up on foundations
- · Read up on roofs, in particular insulation options
- · Organize other side of the barn so that shared wall is easily accessible and potentially dangerous materials are moved somewhere else
Spring/Summer
2016
- · Develop a plan for the foundation, including where to place additional beams, how to secure them to the ground, roof, and walls.
- · Hire structural engineer to review foundation plan, and to confirm whether existing beams are sufficient or if they need to be replaced.
- Foundation and drainage work, roof repairs
- · Clean, sand, and prepare north facing interior wall
- · Purchase straw and put in barn to dry
- · Continue solar map work
- · Continue materials search/collection
- · Read up on electrical & composting toilets
Fall/Winter 2016-17
- · Hire electrician to wire barn so there are outlets throughout
- · Wattle and daub exterior of north wall
- · Frame west and east walls
- · Remove horizontal planks from south wall and frame
- · Develop plan for composting toilet
Spring/Summer
2017
- · Hire plumber for hot water in the kitchen and develop plan for eventual outdoor shower
- · Raise west and east straw bale walls
- · Raise south stick built wall
- · Finish interior walls
- · Put in earthen floor
Fall
2017
- · Soft move in!
- · Start on interiors: kitchen, room divider/storage unit, etc
Allie Westhoff
Natural Building Summer 2015
Home Design
The past few weeks I have been sketching rough plans of my home, researching the building codes and permits required to build an accessory dwelling unit in Garfield County, Colorado.
I've decided to base the house's plan around a golden rectangle with the rooms in golden ratio sections. The interior dimensions are 25ft by 41ft with an additional 8ft wide greenhouse running the length of the south side. This gives me 1025 square feet of space in the home, and 296 square feet to work with in the greenhouse. The bathroom will be on 3 ft stem walls and kitchen will be on 5 ft stem walls made from stone and mortar on the south side of the house. This will provide a crawl space to accommodate grey water systems, plumbing, gas lines, and a root cellar under the kitchen. Ideally I will use as little concrete as possible in the foundation, utilizing a rubble trench with a thin concrete slab on top. There are a lot of large stones on my land and I want to stack them with concrete mortar to form the stem walls for the kitchen and bathroom. The bedroom and living areas will be dug to 36" into the earth with a monolithic slab foundation on top of an insulated floor. There will be steps up to the elevated part of the home, and steps down into the greenhouse which will be set on piers with undisturbed earth as the floor. The frame will be post and beam, with straw bale infill on the north east and west walls. The interior walls and the south side of the house will be blends of stone, wood, cob, and glass (or a similar clear material with better insulation). There will also be a loft above the living room.
Ideally in the future I will attain all my energy from wind turbines and solar panels, contain the gases from my compost as fuel for my stove, and grow the majority of my own food year round. I also hope to create a large duck pond with my treated grey water and plant an extensive food forest of mountain friendly plants. The goal is to create a diverse home stead that will create habitat for wildlife and make the land better with development.
Here are my floor plan and foundation plans:


The house will be located in Glenwood Springs, Colorado at an elevation of 6400 ft. There's an average rainfall of 21 inches a year and average snowfall of 51 inches per year. The wind on the property comes primarily from the west and south west. We get very cold winters and hot summers, so good insulation and the right window/ thermal mass ratio is important. The frost line that the foundation must be dug to is 36 inches, the wall's insulation must have a value of R-20, and the snow load requirement that my structure must be able to support is 40PSI.
If all goes according to plan I will be starting construction in the spring of 2016... and with the help of friends and family hopefully have it finished in two years.
Links:
Adobe floor tutorial: http://buildnaturally.blogspot.com/search/label/adobe%20floor
Strawbale tips: http://buildnaturally.blogspot.com/search/label/strawbale
Passive Solar Heating and Cooling: http://passivesolar.sustainablesources.com/
Attached Greenhouse Info: http://www.theyearofmud.com/2012/04/02/build-your-own-attached-greenhouse/
Nomadic Gardening: Biodegradable Cleanliness
It seems backwards to be constantly shipping off human waste with clean water. There are ways that solid waste can be handled and urine is quite easy to control once diverted. However, when we bathe there is a certain amount of water that gets dirty even when running a tub.
Can we know when we clean ourselves that we are giving back to mother earth? The soap we use can be natural, the materials of the building can be locally sourced, and our waste water can be used to grow something important. That is why I wanted to design an outhouse/ bathing house that would eventually biodegrade completely - and in the meantime create a new feature in the environment from its waste.
This would involve building a structure, setting up plumbing naturally with bamboo pipes or other found objects, and directing the used water into a location where it can be further processed or utilized such as a wetland or garden. The water could be piped in, fed by rainwater reserves, or collected from the air.
One goal of this project was to explore different timelines of decomposition and leaving a structure behind that doesn't have to be maintained but that can provide solace to the next person and eventually change in it's usage. The plants may tear in through the wall and fertile land could cause the spot beside your project to turn into a vegetable patch. At the very least, it will tumble back to the earth as it began.
I decided to focus on waterproofing methods for a building like this. The areas that may need to be covered by waterproofing are anywhere that water may pool and humans may touch often.
I decided to focus on waterproofing methods for a building like this. The areas that may need to be covered by waterproofing are anywhere that water may pool and humans may touch often.
There are many ways to waterproof naturally. Lanolin and shellac are natural waxes secreted by animals. Oils like tung and linseed are made by pressing seeds into what is called a drying oil - which will harden with oxidization. These differ from waxes and resins in that the latter two can redissolve, not having covalent bonds forming as there is with drying oils. This makes then readily biodegradable. Resins like dammar gum and copal have been used for centuries and are extracted from trees. I will be focusing on pine resin. Resin is secreted by plants but is different from sap, latex, or mucilage. It is also called pitch which is the name for viscoelastic, solid polymers.
One way of extraction is dry distillation and this is done by heating wood until tar and resin drips from it and charcoal remains. This releases gasses but those can be captured along with the oil from the top or released. This is what a “Tar Kiln” in Scandinavia is used for. Resin has no nutritive purpose for a plant but seals up wounds in trees. This is why the other extraction process is to cut the tree and harvest what resins drip out.
Resin can be mixed with beeswax and caranuba or other sawdust to create “cutlers resin” which has been used to attach knife blades for centuries. The beeswax can be replaced with any fat as a softening agent. Animal manure can be used for the fiber. This combination should work well for waterproofing. You can use Pine resin to waterproof boots and boats. It is highly flammable but can be solidified onto a stick with a double boiler method to be later re-melted for application.
Bamboo Reinforced Cob: Seismic Stability
A quick seismic history: "Understanding the seismic performance of structures in terms of engineering science is of recent vintage. Only in the twentieth century did information begin to emerge on how structures respond in earthquakes. Historical building practices developed with the accumulation of experience gained through trial and error. The first measurements of ground motions in damaging earthquakes were not taken until 1933, and it was not until the 1970s that the first recordings were made of a building as it responded to an earthquake that caused damage to that structure.”(GSAP 2000)
This is what the cob builder trying to get permitted is up against: “Steel and reinforced concrete are ductile materials that have linear elastic properties and good post-elastic strength characteristics. After yielding, these materials maintain most of their strength while undergoing substantial plastic deformations. They can be analyzed with reasonable accuracy using analytical or computational methods. In contrast, the behavior of brittle, unreinforced materials—such as stone, brick, or adobe—is extremely difficult to predict after cracks are initiated, even with today’s advanced computational capabilities. Even if results could be generated with these technologies, they would not be accurate.”(GSAP 2000)
methods. In contrast, the behavior of brittle, unreinforced materials—such as stone, brick, or adobe—is extremely difficult to predict after cracks are initiated, even with today’s advanced computational capabilities. Even if results could be generated with these technologies, they would not be accurate.”(GSAP 2000)
GSAP's strap method is a retrofit to an adobe structure that uses steel to reduce out-of-plane collapse. "The retrofit systems tested in GSAP involved horizontal and vertical straps, ties, vertical center-core rods, and improvements in the anchoring of the roof to the walls. Each method proved to be successful in reducing the tendency of the model buildings to collapse.”(GSAP 2000)
To me, this shows that reinforcement is key to seismic resistance. However, I am more interested in cob structures and building with local resources. I was able to get in contact with Peter Hickson, a carpenter and building contractor with 37 year of experience. Originally I thought it was odd that he included demolition as part of his experience, but then I remembered our topic and immediately realized the significance.

In 2006 he designed and built a low cost bamboo reinforced cob house in the Philippines. The goal was to build a functional house that was both earthquake safe and affordable to the locals.

They chose a monolithic reinforced concrete slab as their foundation, then built the first floor and attic roof using coco lumber.
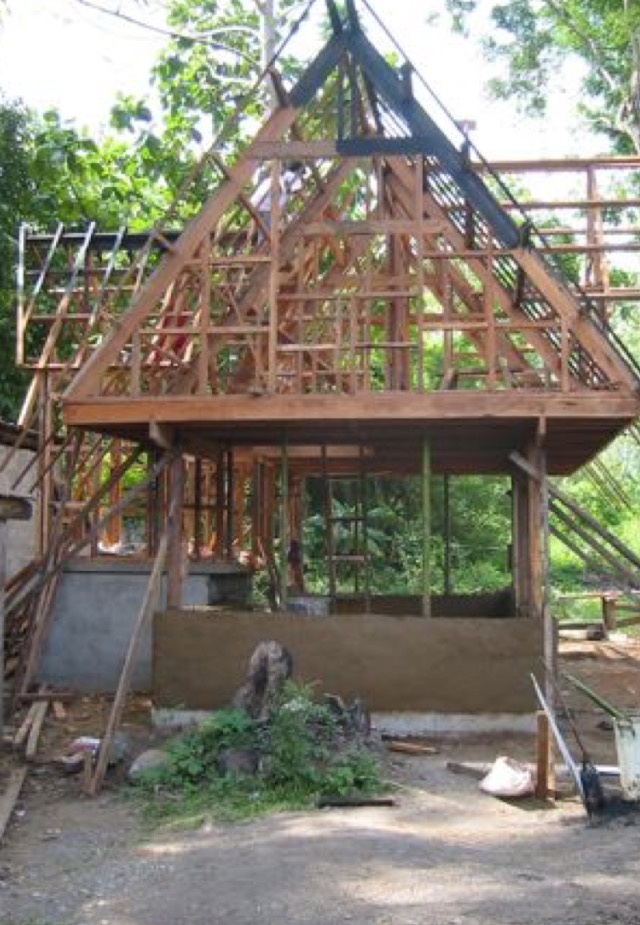


wall about 1 foot thick
- bamboo ladder mesh of split bamboo wired together for every 15” rise in the structure.
- Monolithic earth walls are stronger than earth brick walls in earthquakes
- Composite of bamboo and cob works like reinforced concrete (RC) with earth in compression and bamboo in tension and tying across weak points around openings.
- Vertical bamboo connected to a structural diaphragm inhibits movement therefore displacement of center of walls subjected to horizontal out of plane loads.
- Weight of the cob walling resists uplift on the building in strong winds.
- RC strength but affordable and more sustainable.
In 2012 Peter teamed up with a few University of Technology, Sydney (UTS) students as his cob structure was challenged by an engineer. “Two final year engineering students Luke Punzet and Jean-Michel Albert-Thernet worked with me as part of their final year Capstone project. We built “U” shaped test panels reinforced and unreinforced cob as a comparative study with work previously undertaken by Dominic Dowling as part of his PhD research into what he called quake safe adobe. The cob and reinforced cob walls proved much stronger than any of the mudbrick panels tested by Dom. The “U” shaped panels were so strong they were not challenged by the testing.” (Hickson 2015)
Next, they build a scaled model of the house he built in the Philippines. The model was complete with window openings, an upper floor and roof loads to represent a more accurate test of a bamboo reinforced cob building as an entire system.
After the build was completed to their satisfaction, they put it to the shake test and chose the 2001 El Salvador earthquake, measuring 7.8, as their guide. The team subjected the model house to a 100% shake, 125% (which makes that a 8.6 magnitude quake) and then two more 100% to ensure no further damage and to simulate a series of aftershocks. The structure was slightly damaged as some cracking was noticed near the top of a wall, but overall it was deemed safe enough to enter and that it might not even need repair. A Prof Samili (Engineer?) claimed that this reinforced cob system can be safely used anywhere that seismic activity is a concern.
Resources:
Peter Hickson’s reinforced cob:
Tuesday, July 28, 2015
Treebog Composting Toilet
Kendra White

Composting toilets present humans with a great opportunity to create a closed loop cycle, to return nutrients to the earth, reduce the amount of resources used and to minimize the waste they produce. Fitting a home with a waterless toilet not only shrinks your carbon footprint but it produces highly fertile soil amendments that can be added to the soil for non-edible plants, fruit trees and shrubs. There are many options when choosing the system that best your lifestyle, by considering all of one's needs it's easy to find the most compatible system for your household. Some models can be simple as squatting over a 5 gallon bucket, while others can get complex and include urine diverters, on site composting piles, mobile structures and manufactured, code compliant units which can be installed in one's house. This paper will focus on a permaculture design known as a "treebog," it is a relatively new design which requires very little maintenance and is perfect for the site we are working with.
 Tree bogs were designed by a permaculturist after he noticed how his willows thrived in the area he had been chucking the contents of his compost bucket, he coined the term in 1995. Tree bogs have been gaining in popularity ever since and with such a simple, effective method of cycling its no wonder why they are being utilized more and more. Officially, a "tree bog is simply a controlled compost heap whose function has been enhanced by conscious management and the judicious use of moisture/nutrient-hungry trees" (permaculture-wikia.com/wiki/
 I am working on a site owned by my friend in Calaveras County, her plot is very hilly, wildlife is very present and she has a big range of guests so her usage would vary greatly. It was difficult finding a solution for her property due to space limitations, she lives on 10+ acres but most of it is on an incline so open space is limited, she wanted it away from the ho not impeding the huge hilltop view they have from the deck, and because the number of guests she has at one time fluctuates. I knew it could not be anything that required a ton of maintenance, took up too much room or required storage. I think the tree bog would be the best solution for her toilet problem because it can withstand fluctuating usage, would last her several years to indefinitely, would be easy to design for her property and it would be extremely easy for her to maintain. We could utilize one of her hills to achieve the 3ft elevation of commode over pile, with the rate of usage she would have I think the structure could stay put for quite some time because the plants could manage the amount of waste we are expecting and it would prevent her from ever having to handle human waste which is a HUGE plus in her book. Some setbacks for the site are that we would have to establish the willow plants so it wouldn't be functioning until next summer and the one perfect spot we had chosen was later vetoed due to "how nice the view is," the majority maintenance would also happen in the first year between establishing the plants (would require moderate watering and full sun) and building the structure, the following years would only require pruning of the willows and weekly sprinklings of sawdust. You could also sprinkle sawdust after every other use but since too much sawdust could inhibit decomposing it would be best for this site to just assign that task to someone to ensure the nitrogen-carbon ratio stays at a healthy balance.
 In my research I found a few species of willow which would work for her climate but I am recommending she plant the salix Exigua because it is native to California, can tolerate seasonal flooding, requires full sun to filtered shade, and is available for purchase in California for $7.99 for a 1-gal plant. Another plant that would work great for her site is the Calisteman, it is drought-resistant, requires full sun to partial shade, attracts hummingbirds and is deer resistant. Both of these plants would require some time to establish but once they are the tree bog would help them thrive and create a nutrient cycle which would drastically limit water usage, decompose waste and help the eco system thrive.
  Our waste is having a detrimental affect on the earth and its inhabitants, today we flush our waste and expect others to deal with it but, as stewards of the earth it is our responsibility to come up with solutions which are ecologically sound. Every other species on the planet redeposits their waste into the earth for it to be used again, why should we be different? Human waste is not a topic people are too keen on talking about but it is a very important one and one that must be addressed as our population is only increasing and the dead zones in our oceans expanding. It is up to us to get creative and find solutions that work for us AND the environment. Composting toilets present such a great opportunity for us to change one small thing in our life and make one big change within the world. Your urine can help fertilize crops, your poop can help amend soil and add nutrients to the earth, that is how we were meant to interact with the world around us and the longer we consider flushing our waste down our porcelain thrones in potable water a viable solution, the bigger the problem we face will be.
Subscribe to:
Posts (Atom)